Getting Started guide
This tutorial will walk you through the minimum steps needed to run an OpenSAFELY-compliant study against "dummy" (randomly-generated) patient data. We ask all potential collaborators to successfully complete this tutorial, before applying to run their project against real data.
This is a first draft of the tutorial, and may have errors or omissions. Please don't be afraid to ask questions in our Q&A forum!
Motivation🔗
OpenSAFELY is designed to allow you to do all of your analytic work on your own computer, without ever having to access the real, sensitive, patient-level data.
To use the OpenSAFELY framework effectively, you need to:
- have a few pieces of software available; and
- understand a few concepts which might be new to you.
Running OpenSAFELY🔗
Options for running OpenSAFELY🔗
In this guide, we've documented two different ways to work with OpenSAFELY:
-
Use an online environment where the needed software is already installed for you.
Services such as Gitpod provide online computing environments. Gitpod has a free plan with a generous monthly usage limit — 50 hours — for working with code in public or private repositories. We've adapted our demonstration research study and this guide such that you can follow along with Gitpod, should you choose to do so.
You might prefer an online environment if one or more of the following apply:
- you are investigating what OpenSAFELY offers and want to start using it immediately;
- you do not have administrative access to install software on your work computer;
- you are not sure about whether your computer supports Docker, which OpenSAFELY uses;
- you want to try OpenSAFELY via a device other than a desktop or laptop computer, e.g. a tablet.
To use Gitpod, the only requirements are:
- you have a current version of a modern web browser (e.g. Chrome, Edge, Firefox, Safari);
- your network connection does not block access to the Gitpod development environment.
If your internet connection is not managed by you directly — perhaps you are in the office or connecting via your employer's virtual private network (VPN) — it may be that corporate firewalls prevent access to Gitpod; please contact the IT staff who manage your internet connection for help.
-
Install the required software to your own computer.
You might prefer a local installation if one or more of the following apply:
- you already have the software required (Docker, Python and Git or GitHub Desktop) installed;
- or you don't already have the required software installed, but are comfortable installing and configuring these tools yourself;
- you want to have more control on the tools you use to develop studies for OpenSAFELY.
The current local installation guide is aimed at Windows users. Mac users should be able to follow along as well, with a few hopefully-obvious alterations; see also the macOS Install Guide! We aim to integrate macOS instructions into this guide in future.
Following this Getting Started guide🔗
Note
Tabbed sections like the example immediately below split the configuration instructions into web browser and local Windows installation. Where these tabbed sections appear, select the relevant tab and follow only the instructions for that section.
These "Web browser" sections will explain how to use OpenSAFELY in a web browser via the Gitpod service.
These "Windows" sections will explain how to use OpenSAFELY using software installed directly on a Windows machine. These instructions are not necessary to follow if you are using a web browser to run OpenSAFELY, even if that web browser is running on Windows.
Why OpenSAFELY requires several pieces of software to run
Some of the software needed is so you can execute code on your computer in exactly the same way it is run in the secure environment: even a slight mismatch in the versions of the software could cause bugs and delays.
OpenSAFELY is also designed to encourage analysts to adopt best-practice
software development processes, like using git for version control. If
you're new to these concepts, there may be quite a lot to learn, and you'll need
to use further software to work with them. The investment will be worthwhile:
you'll find your software quality and efficiency will benefit hugely.
This tutorial is, therefore, a very fast tour through all the essential components required to get up and running. When you've finished, you'll have all the basics in place to continue your learning.
1. Set up GitHub🔗
To use OpenSAFELY, you must have a GitHub account. GitHub is a widely-used
website for storing and collaborating on software, using the version control
software git. GitHub is where your open, reproducible research will be
published.
Creating a GitHub account🔗
If you do not already have a GitHub account, you should create one first.
Visit GitHub and click the "Sign up" button. You will have to provide an email address and password. GitHub will also send you a confirmation email containing a link that you need to visit to confirm your account.
It is possible to follow the "Web browser" instructions and sign up on GitHub's site.
If you install GitHub Desktop, the GitHub Desktop installation process will also walk you through the process of creating an account, if you don't already have one.
If you already have a GitHub account, GitHub have guides on authenticating an existing account with GitHub Desktop.
(If you already have git configured and are reasonably confident using
it, GitHub Desktop is not required. You need to be able to clone the
template repository that you will create, then add, commit and
push changes to that repository to GitHub.)
Securing your GitHub account🔗
We recommend that you secure your GitHub account with two-factor authentication.
2. Create a new repository in GitHub🔗
Here, you'll copy our OpenSAFELY research template to your own GitHub account, for developing your own study:
- Click on the link below to create new repository based from our template.
You may need to log in to GitHub if you are not already logged in:
https://github.com/opensafely/research-template/generate. - Use the Owner drop-down menu, and select the account you want to own the
repository (typically under your own account)
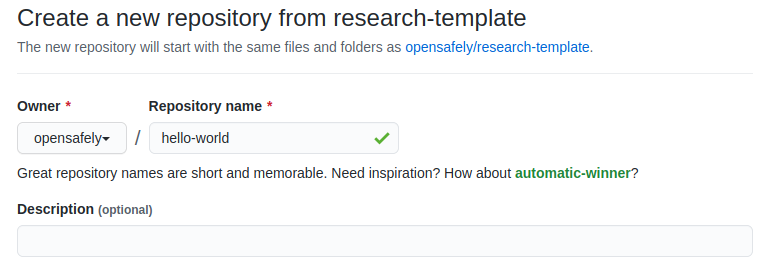
- Type a name for your repository, and an optional description
- Choose a repository visibility. This would usually be "Public"
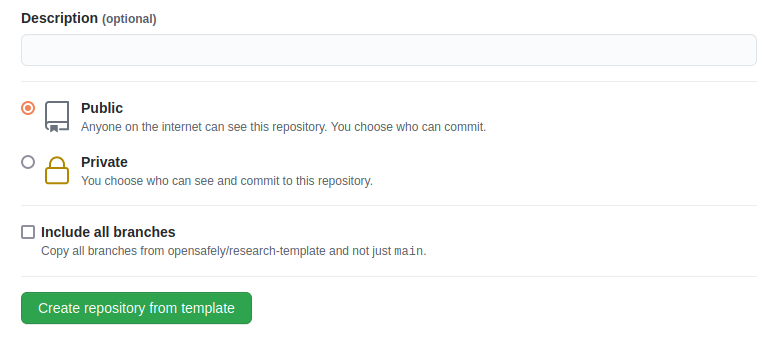
- There is an "Include all branches" option: this does not need to be selected. (You only need the main branch; the other branches are work-in-progress changes.)
- Click Create repository from template
- The new GitHub repository will take a moment to initialise, as it is running some setup in background. Wait about 1 minute, then reload the page, and you should see the README displayed now reflects the name you gave to the new repository.
- Once created, select the "Settings" tab and scroll down to the option to the option to "Automatically delete head branches". This should be turned ON so that when you merge a branch it is automatically deleted, keeping your branches neat and tidy. Deleted branches can be restored if needed later.
If you see ${GITHUB_REPOSITORY_NAME} in your README, the repo is not yet initialised, wait a few seconds longer and reload.
3. Setup the required software🔗
Open your repository with Gitpod
For the repository you just created, there should be a Gitpod: ready to
code button displayed in the README. Click on that button to open your
new repository in Gitpod.
If it is the first time you have used Gitpod, you'll see a "Log in" screen. You can use your GitHub account to login to Gitpod: click "Continue with GitHub".
A Gitpod workspace containing the Visual Studio code editor with a command-line interface "terminal" should then appear. This may take a little bit longer the first time a workspace is started, perhaps 30 seconds to a minute.
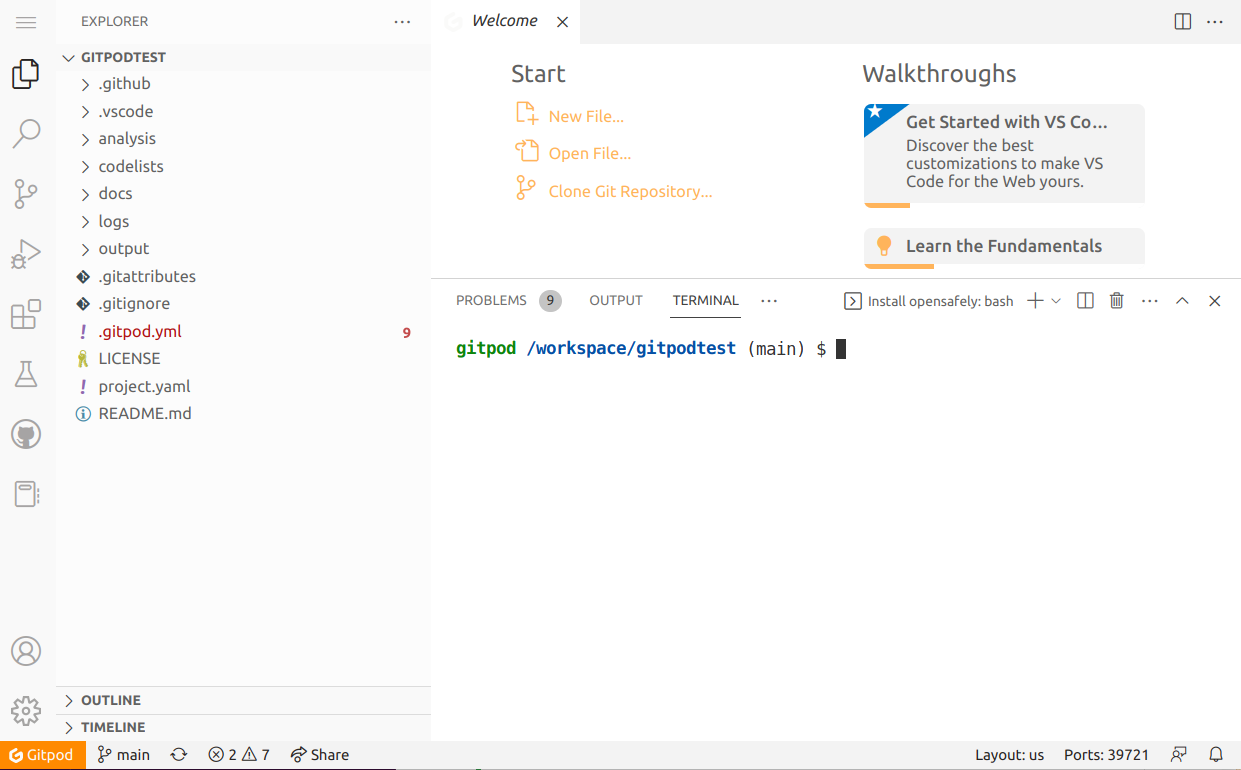
The terminal at the bottom-right of the Gitpod workspace runs commands on a computer (virtual machine) provided by Gitpod.
The large, upper-right area holds the main editor and where you will
view and edit files that you are working on. The left "side bar"
holds the Explorer when you first start the workspace. There are
other useful menus in this area that can be switched with the icons
to the far left side. Finally, the button at the top-left with three
horizontal lines (≡) is the menu button, which allows you to
access many more options.
If you find yourself using Gitpod regularly for working on research, we have a brief guide to managing Gitpod workspaces.
Running opensafely
The opensafely software should already be installed if you start
Gitpod for the OpenSAFELY research template.
You can confirm this by typing opensafely in the terminal at the
prompt $ and pressing Enter. You should see an output that looks
something like:
$ opensafely
usage: opensafely [-h] [--version] COMMAND ...

optional arguments:
  -h, --help  show this help message and exit
  --version   show program's version number and exit

available commands:

  COMMAND
help      Show this help message and exit
run       Run project.yaml actions locally
codelists
          Commands for interacting with https://codelists.opensafely.org/
pull      Command for updating the docker images used to run OpenSAFELY studies locally
upgrade   Upgrade the opensafely cli tool.
To develop an OpenSAFELY study on your own computer, you will need to install a
few things. Most important is the opensafely tool; to install this, you must
(currently) first install the Python programming language.
Install Python and opensafely
- Download and run the Anaconda Python installer.
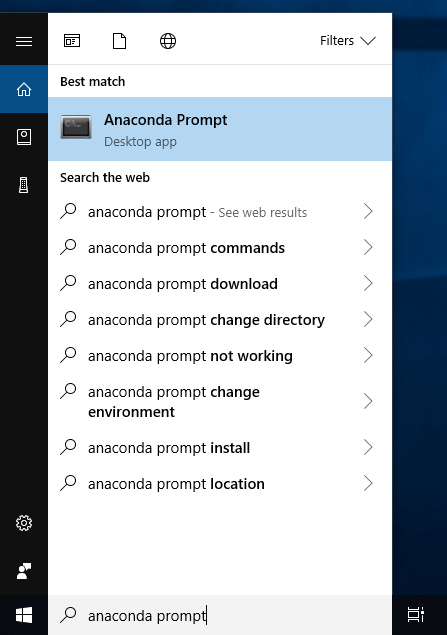
- When you've done, to verify your installation, open Anaconda Prompt by
clicking Start, search, or selecting Anaconda Prompt (or Anaconda Powershell)
from the menu.
- To install the OpenSAFELY command line tool, you first need to
install a tool called
pip. (pipis used for installing Python software and libraries.) Do this by typingconda install pipand pressing Enter. - Now you can install the OpenSAFELY command line tool, by typing
pip
   install opensafely
, and pressing Enter. You should see a message to the effect ofSuccessfully installed opensafely. - To confirm everything is working, type
opensafelyand press Enter. If the OpenSAFELY tool is working, this will show help text on how to use theopensafelycommand.
Install Docker
Note
On Windows, installing Docker is usually straightforward, but can sometimes be complicated, depending on your exact version and configuration of Windows. If you run into problems, our more detailed installation notes may help.
- Follow the Docker for windows installation instructions. If you are using Windows 10 Pro, Enterprise or Education, you should follow the instructions for Hyper-V backend and Windows containers. If you are using Windows Home or an earlier build of Pro or Education, follow the instructions for WSL 2 backend. Unfortunately, we've had reports that installing in Windows Home can be very challenging. Please let us know if you can help us improve the documentation here.
- Starting Docker can take a while — up to 5 minutes. While it's doing
so, an animation runs in the notification area:
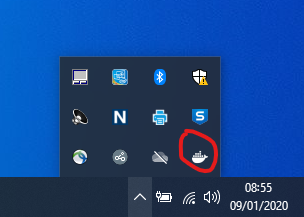
- When Docker has finished starting up, share your hard drive with Docker: click the system tray docker icon; select "settings"; select "shared drives".
- If you have ended up with the Hyper-V backend, then when Docker has finished starting up, you will need share your hard drive with Docker: click system tray docker icon; select "settings"; select "shared drives". This setting does not exist in the WSL 2 backend.
- Test Docker and opensafely work together. Open an Anaconda Prompt, and run
opensafely pull cohortextractor. This will pull down the OpenSAFELY cohortextractor images, which can be used to run actions in your study. The first time you run it, this may take a little time, depending on your network connection. It is downloading a reproducible environment identical to that installed in the OpenSAFELY secure environment.
4. Set up your first study🔗
In a previous step, you created a copy of the research code in GitHub. You need to have a copy, or "clone", of that code to develop your own study.
Clone the study code to your computer🔗
There's nothing to do here! When you open the Gitpod workspace, the associated code from GitHub will already be cloned and available in the code editor. You'll see the files and folders in the Explorer.
Please follow GitHub's instructions for cloning the study code with GitHub Desktop.
Test the blank study on your computer🔗
There's nothing to do here! In the following sections, type any
opensafely commands in the terminal available at the bottom-right of the
Gitpod workspace. Copy the commands and then press Enter to run them.
You can open a prompt to run the study code:
- Open Anaconda Prompt (or use an already-open one)
- Change your current directory to the location of your cloned, local path. To
do this, use the
cdcommand. For example,cd C:/Users/me/my-git-repos/hello-worldand press Enter.
Run the opensafely commands in the Anaconda Prompt. In Windows, note that
the command-line prompt may be something like > instead of $; any
commands written here with the $ prompt will also work on Windows.
Run your first study🔗
Now you're ready to run your first study. Ensure your current directory is your newly-cloned study repository, and run:
$ opensafely run run_all
pressing Enter once you've typed the command.
The first time you run this command, it may take a while to download the required software. Eventually, you should see output that ends something like this:
<...several lines of output...>
generate_study_population: Extracting output file: output/input.csv.gz
generate_study_population: Completed successfully
generate_study_population: Cleaning up container and volume

=> generate_study_population
Completed successfully

log file: metadata/generate_study_population.log
outputs:
 output/input.csv.gz  - highly_sensitive
output/input.csv.gz, and that it should be considered highly sensitive
data. What you see here is exactly the same process that would happen on a real, secure
server.
Because we haven't modified the template blank study yet, this CSV file is still empty — we'll generate dummy data that contains no real patient information in the next section.
Accessing files🔗
The Visual Studio Code editor has a file Explorer that you can use to browse the files and appears when first starting the Gitpod workspace. It is accessed by the file icon in the bar on the left-hand side of the editor.
Clicking on a file name in the Explorer will open the file in a tab within the editor.
The new output files are created in the local copy of the
repository in the output/ directory, e.g. C:/Users/me/my-git-repos/hello-world/output/.
5. Make changes to your study🔗
You've successfully run the code in your study, but at the moment it just creates an empty output file. Now we'll add some code to do something slightly more interesting.
Visual Studio Code as a code editor🔗
In order to write code in the OpenSAFELY framework, a code editor will make your life much easier. The steps here use Visual Studio Code. Gitpod users already use Visual Studio Code by default in workspaces.
Visual Studio Code is also available free of charge for Windows, macOS and Linux. If you are working on your own computer and not in Gitpod, and are already comfortable using another code editor, then that editor will be suitable.
Here we'll only use Visual Studio Code for the examples. There are several short videos and written guides elsewhere on how to use more of Visual Studio Code's features.
By default, the Visual Studio Code configuration we provide will automatically save the edits to files that you make.
There's nothing to do here! When you open a Gitpod workspace, Visual Studio Code is ready to use as the default editor and has your research repository opened.
Download and install Visual Studio Code. Then start Visual Studio Code and use the menu to open your research repository (File > Open Folder...)
Add an age column🔗
- The "Explorer" on the left hand side lists the files and folders in
your research repository. Find and click on the
study_definition.pyfile inside theanalysisfolder. This file specifies the population that you'd like to study (dataset rows) and what you need to know about them (dataset columns). - Add some text so that the file looks like this (new text highlighted):
Line 10 means "I'm interested in all patients who have never changed practice, between these two dates"; lines 14-15 "Give me a column of data corresponding to the age of each patient on the given date"; and lines 16-18 "I expect every patient to have a value, and the distribution of ages to match that of the real UK population"
 1
 2
 3
 4
 5
 6
 7
 8
 9
10
11
12
13
14
15
16
17
18
19
20
21
from cohortextractor import StudyDefinition, patients, codelist, codelist_from_csv # NOQA study = StudyDefinition( default_expectations={ "date": {"earliest": "1900-01-01", "latest": "today"}, "rate": "uniform", "incidence": 0.5, }, population=patients.registered_with_one_practice_between( "2019-02-01", "2020-02-01" ), age=patients.age_as_of( "2019-09-01", return_expectations={ "rate": "universal", "int": {"distribution": "population_ages"}, }, ), ) - If you run:
$ opensafely run run_all
you'll see the command does nothing (because there's already a file at output/input.csv.gz):
=> All actions already completed successfully
Use -f option to force everything to re-run
We can use the --force-run-dependencies (or -f) option to force
the CSV file to be created again.
$ opensafely run run_all --force-run-dependencies
A new input.csv.gz file will be created in the output folder. This is a compressed version of that data.
To view it, first run opensafely unzip output, then open that
file (by left-clicking the filename in Visual Studio Code's Explorer, or
software like Excel). This time, you'll see it now contains synthetic data: an age
for 1000 randomly generated patients (we'll see shortly how this is defined).
Add a chart🔗
Every study starts with a study definition like the one you just edited.
When executed, a study definition generates a compressed CSV (.csv.gz) of patient data.
A real analysis will have several further steps after this. Each step is defined in a separate file, and can be written in any of the programming languages supported in OpenSAFELY. In this tutorial, we're going to draw a histogram of ages, using either four lines of Python or just a few more lines of R.
- Right-click on the
analysisfolder in the editor's Explorer and select "New file". Type "report.py" as the filename and press Enter. - Add the following to
report.py:.import pandas as pd data = pd.read_csv("output/input.csv.gz") fig = data.age.plot.hist().get_figure() fig.savefig("output/descriptive.png")
- Right-click on the
analysisfolder in the editor's Explorer and select "New file". Type "report.R" as the filename and press Enter. - Add the following to
report.R:.library('tidyverse') df_input <- read_csv( here::here("output", "input.csv.gz"), col_types = cols(patient_id = col_integer(),age = col_double()) ) plot_age <- ggplot(data=df_input, aes(df_input$age)) + geom_histogram() ggsave( plot= plot_age, filename="descriptive.png", path=here::here("output"), )
- Right-click on the
analysisfolder in the editor's Explorer and select "New file". Type "report.do" as the filename and press Enter. - Add the following to
report.do:.!gunzip output/input.csv.gz import delimited using output/input.csv // TODO plot equivalent // TODO save plot
This code reads the CSV of patient data, and saves a histogram of ages to a new file.
-
Open
project.yamlin the editor. This file will be near the end of the list of files and folders. This file describes how each step in your analysis should be run. It already defines the expectedpopulation_size(1000), and a singlegenerate_study_populationaction which defines the output that we've generated so far. This file is in a format called YAML: the way it's indented matters, so be careful to copy and paste the following carefully. -
Add a
describeaction to the file, so the entire file looks like this:
1 2 3 4 5 6 7 8 9 10 11 12 13 14 15 16 17 18 | |
1 2 3 4 5 6 7 8 9 10 11 12 13 14 15 16 17 18 | |
- Line 13 tells the system we want to create a new action called
describe. - Line 14 says how to run the script (using the
pythonorRrunner). - Line 15 tells the system that this action depends on the outputs of the
generate_study_populationbeing present. - Lines 16-18 describe the files that the action creates. Line 17 says that the
items indented below it are moderately sensitive, that is they may be released
to the public after a careful review (and possible redaction). Line 18 says that
there's one output file, which will be found at
output/descriptive.png.
At the command line, type opensafely run run_all --force-run-dependencies and press
Enter. This should end by telling you a file containing the histogram has been created.
Open it — you can do this via Visual Studio Code's Explorer — and check it looks right.
Warning
Changes you make to files are automatically saved on Gitpod. However, changes will not persist outside of the Gitpod workspace unless you commit and push them to GitHub, as described in the next section.
6. Test your study on GitHub🔗
Now that your study does something interesting, you should "push" it to GitHub, where it can be viewed by others. Your repository is automatically configured with tests to verify the project is runnable, each time you push.
In this section, you will first add the study changes that you've made to a new commit in your repository — a commit represents a stored version of your work — and then send that commit to GitHub by pushing the new commit.
Allow Gitpod to be able to push your changes to GitHub
-
When logged into Gitpod, visit the main Settings page. (Note this is different to the settings in your Gitpod workspace.) Click on your profile image and select User Settings.
-
Select Integrations and under Git Providers, hover over your GitHub details, click the three vertical dots (
⋮) and select "Edit Permissions".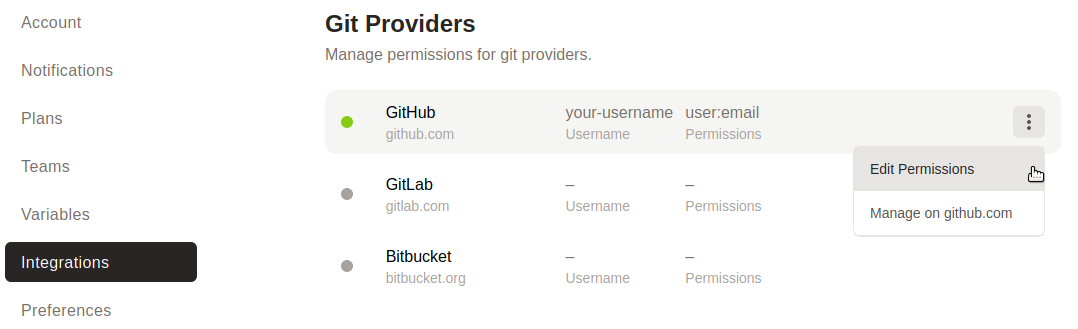
-
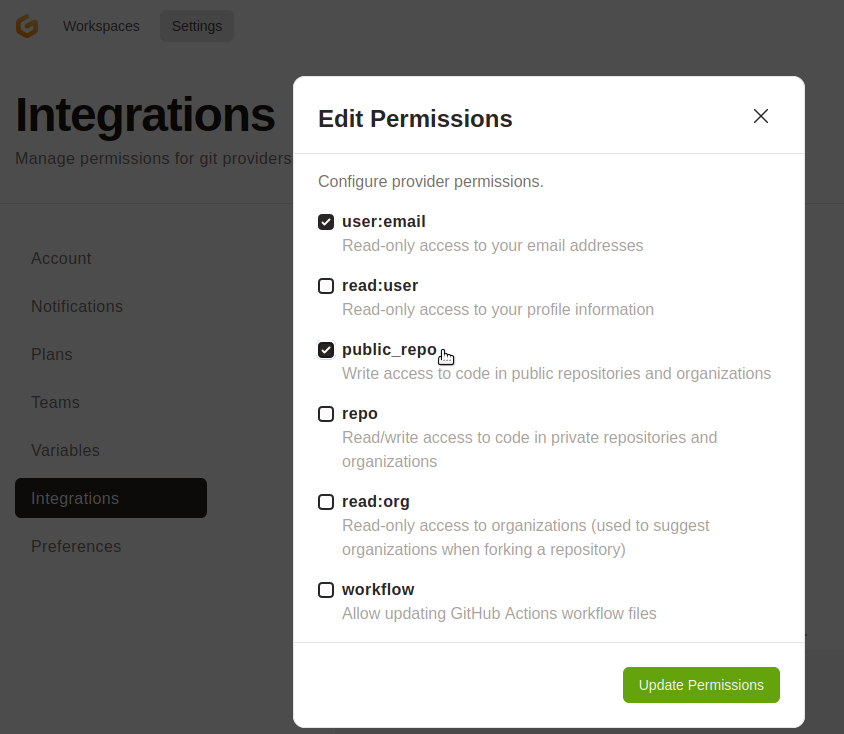
In the list, tick "public_repo", which gives your Gitpod account "write access to code in public repositories and organizations" on GitHub. (There is another permission that you have to enable for access to code if you've chosen to make your repository private)
-
When you select "Update Permissions", you will see a prompt from GitHub asking you to approve the changes, which you will need to do to allow Gitpod to push your work on Gitpod to GitHub.
Add your changes to the local repository
(If you know how to use command-line Git, this works within Gitpod's terminal if you do not want to use Visual Studio Code's Source Control feature.)
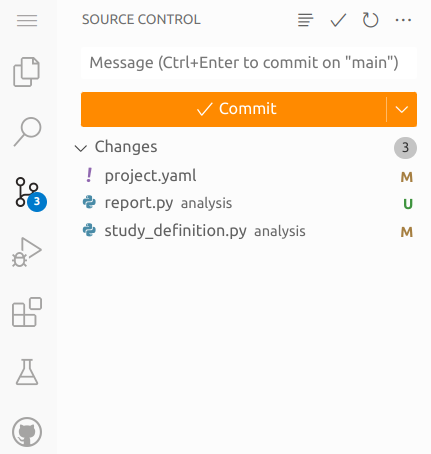
Back in the Gitpod workspace, open the Source Control panel by selecting the icon that has round dots connected by lines on the left-hand side. It should be below the magnifying glass icon.
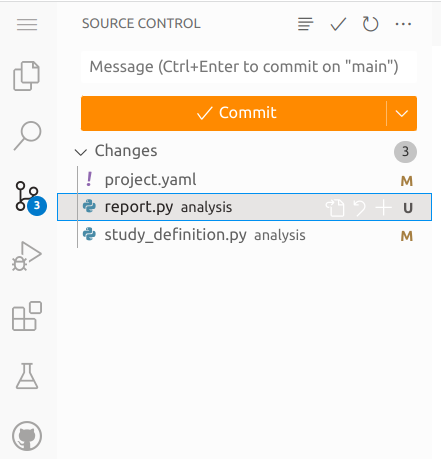
When files in the repository are edited and then saved, Source
Control should list those changes. Note that Gitpod's Visual Studio
Code has Auto Save enabled by default. If you left-click on a file
in Source Control, you'll see how your copy of the file has changed
from the previous repository state. If you hover over a file in
Source Control under "Changes", you can propose to add the changes
to the repository by clicking the + icon next to the filename.
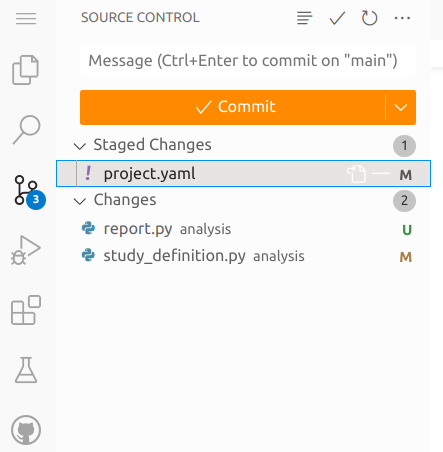
These "staged" changes then appear in the "Staged Changes" section.
Staged changes are changes that you are proposing to include in the next commit of this study repository. These could be modifications of existing files or entirely new files that you include.
It is also possible to "Unstage Changes" if you accidentally stage a
file that you do not want to include. You can do this by hovering
over a file listed in the "Staged Changes" section and clicking the
- icon next to the filename.
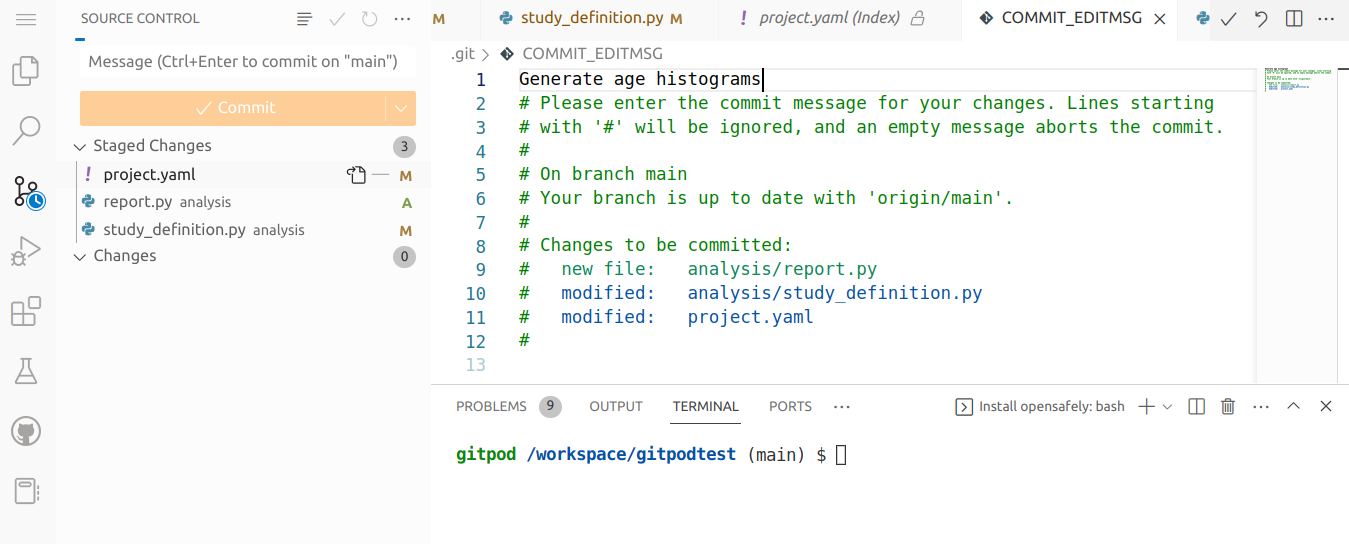
When you've finished staging all your changes, you are now ready to make the new commit. Click the orange Commit button, which will open and editor for you to type a commit message. Type a message to describe the staged changes. When ready, you can then click the tick icon to accept the commit message and commit the staged changes to to add them to the repository as stored in the workspace.
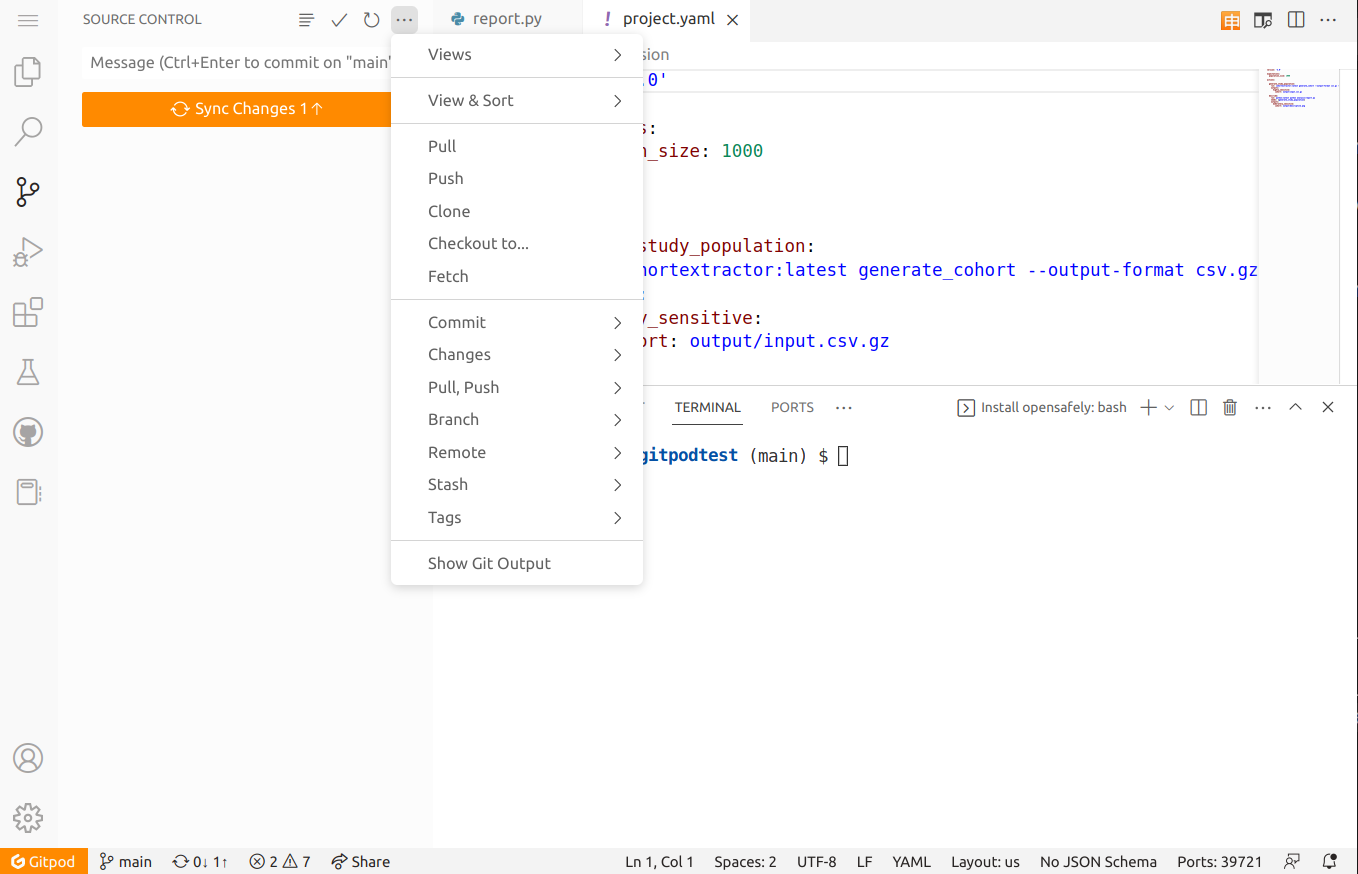
Push the changes to GitHub
The changes have been stored as a new commit in the workspace's local copy of the repository. We now need to push the repository to GitHub to make the changes show up there.
Click the "Sync Changes" button to push your commits. Alternatively,
click the ellipsis (⋯) icon next to "Source Control" and then select
"Push". This should submit your changes to the GitHub repository that
you created earlier.
(You may see a prompt: "Would you like Code to periodically run git
fetch?" You can ignore this or select "Ask me later" for the
purposes of this demonstration.)
Push the changes to GitHub with GitHub Desktop
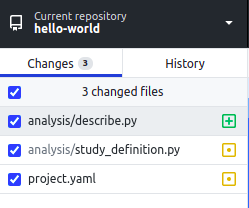
- Open GitHub Desktop to view your repository. When you make changes to files in
your text editor and save them locally, you also see the changes in
GitHub Desktop. To add all changes in all files to a single "commit", tick the
checkbox at the top of the list.
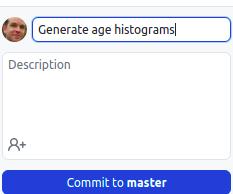
- At the bottom of the list of changes, in the Summary field, type a short,
meaningful description of the changes (this is called the commit message).
Optionally, you can add more information about the change in the
Description field. Press the blue button to make the commit.
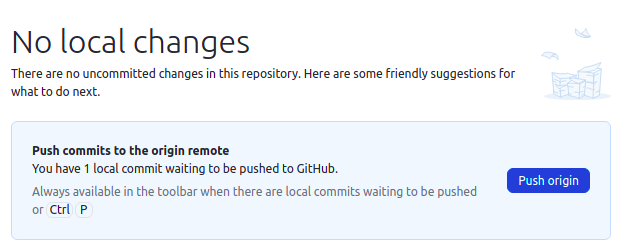
- Click Push origin to push your local changes to the remote repository on
GitHub
Check that the automated tests pass🔗
Visit your repository on GitHub's site. Click on the Actions tab
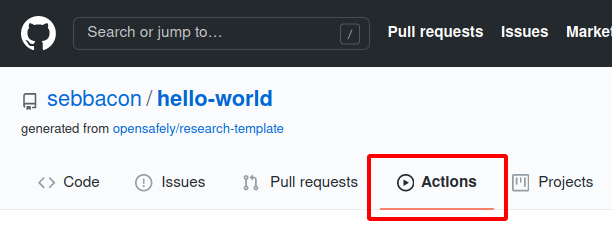
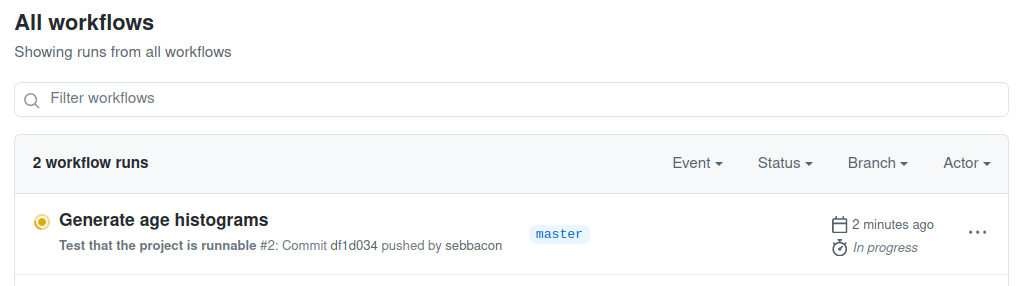
You'll see a Workflow running with the commit message of your last
commit. The workflow verifies that the command opensafely run run_all can
run successfully. If it's yellow, it's still running. If it's red, it
has failed. If it's green, it has succeeded. You want it to be green!
7. Next steps🔗
Congratulations! You've covered all the basics that you need to develop a study on your own computer, verify that it can run against real data, and publish it to GitHub.
To write a real study and run it against actual patient data, you will first
need to get permission for your project from NHS England, the data controllers
for OpenSAFELY's data. Read about our pilot onboarding programme. Once approved, your
Github user account will be added to our opensafely Github organisation, along
with your study repository, which gives you the ability to run your study
against real data. Read more about permissions.
In the meantime, take a look at the rest of our documentation for more detail on the subjects covered in this tutorial. For example:
- There is a more complete guide to the OpenSAFELY command-line tool.
- The full study definition reference describes all the different ways to define new variables in your study definition.
- You'll find more information about the contents of
project.yamlin the Actions reference. - OpenSAFELY walkthroughs (see this notebook) to guide you through the platform workflow on your own computer with dummy data, rather than using the documentation pages alone
- There is a final step we've not described here: a website called the "OpenSAFELY Job Server" where you can submit your repository actions to be run automatically within the secure EHR vendor environments. Right now you can only use this to run real jobs, but we're working on adding the ability to test your repository against dummy data.
- You'll be using
gitand GitHub a lot, and it's a critical but complex part of the OpenSAFELY ecosystem. If you're not familiar with these concepts, it's a good idea to read our git workflow page and its linked content.